Webhook subscriptions
Process
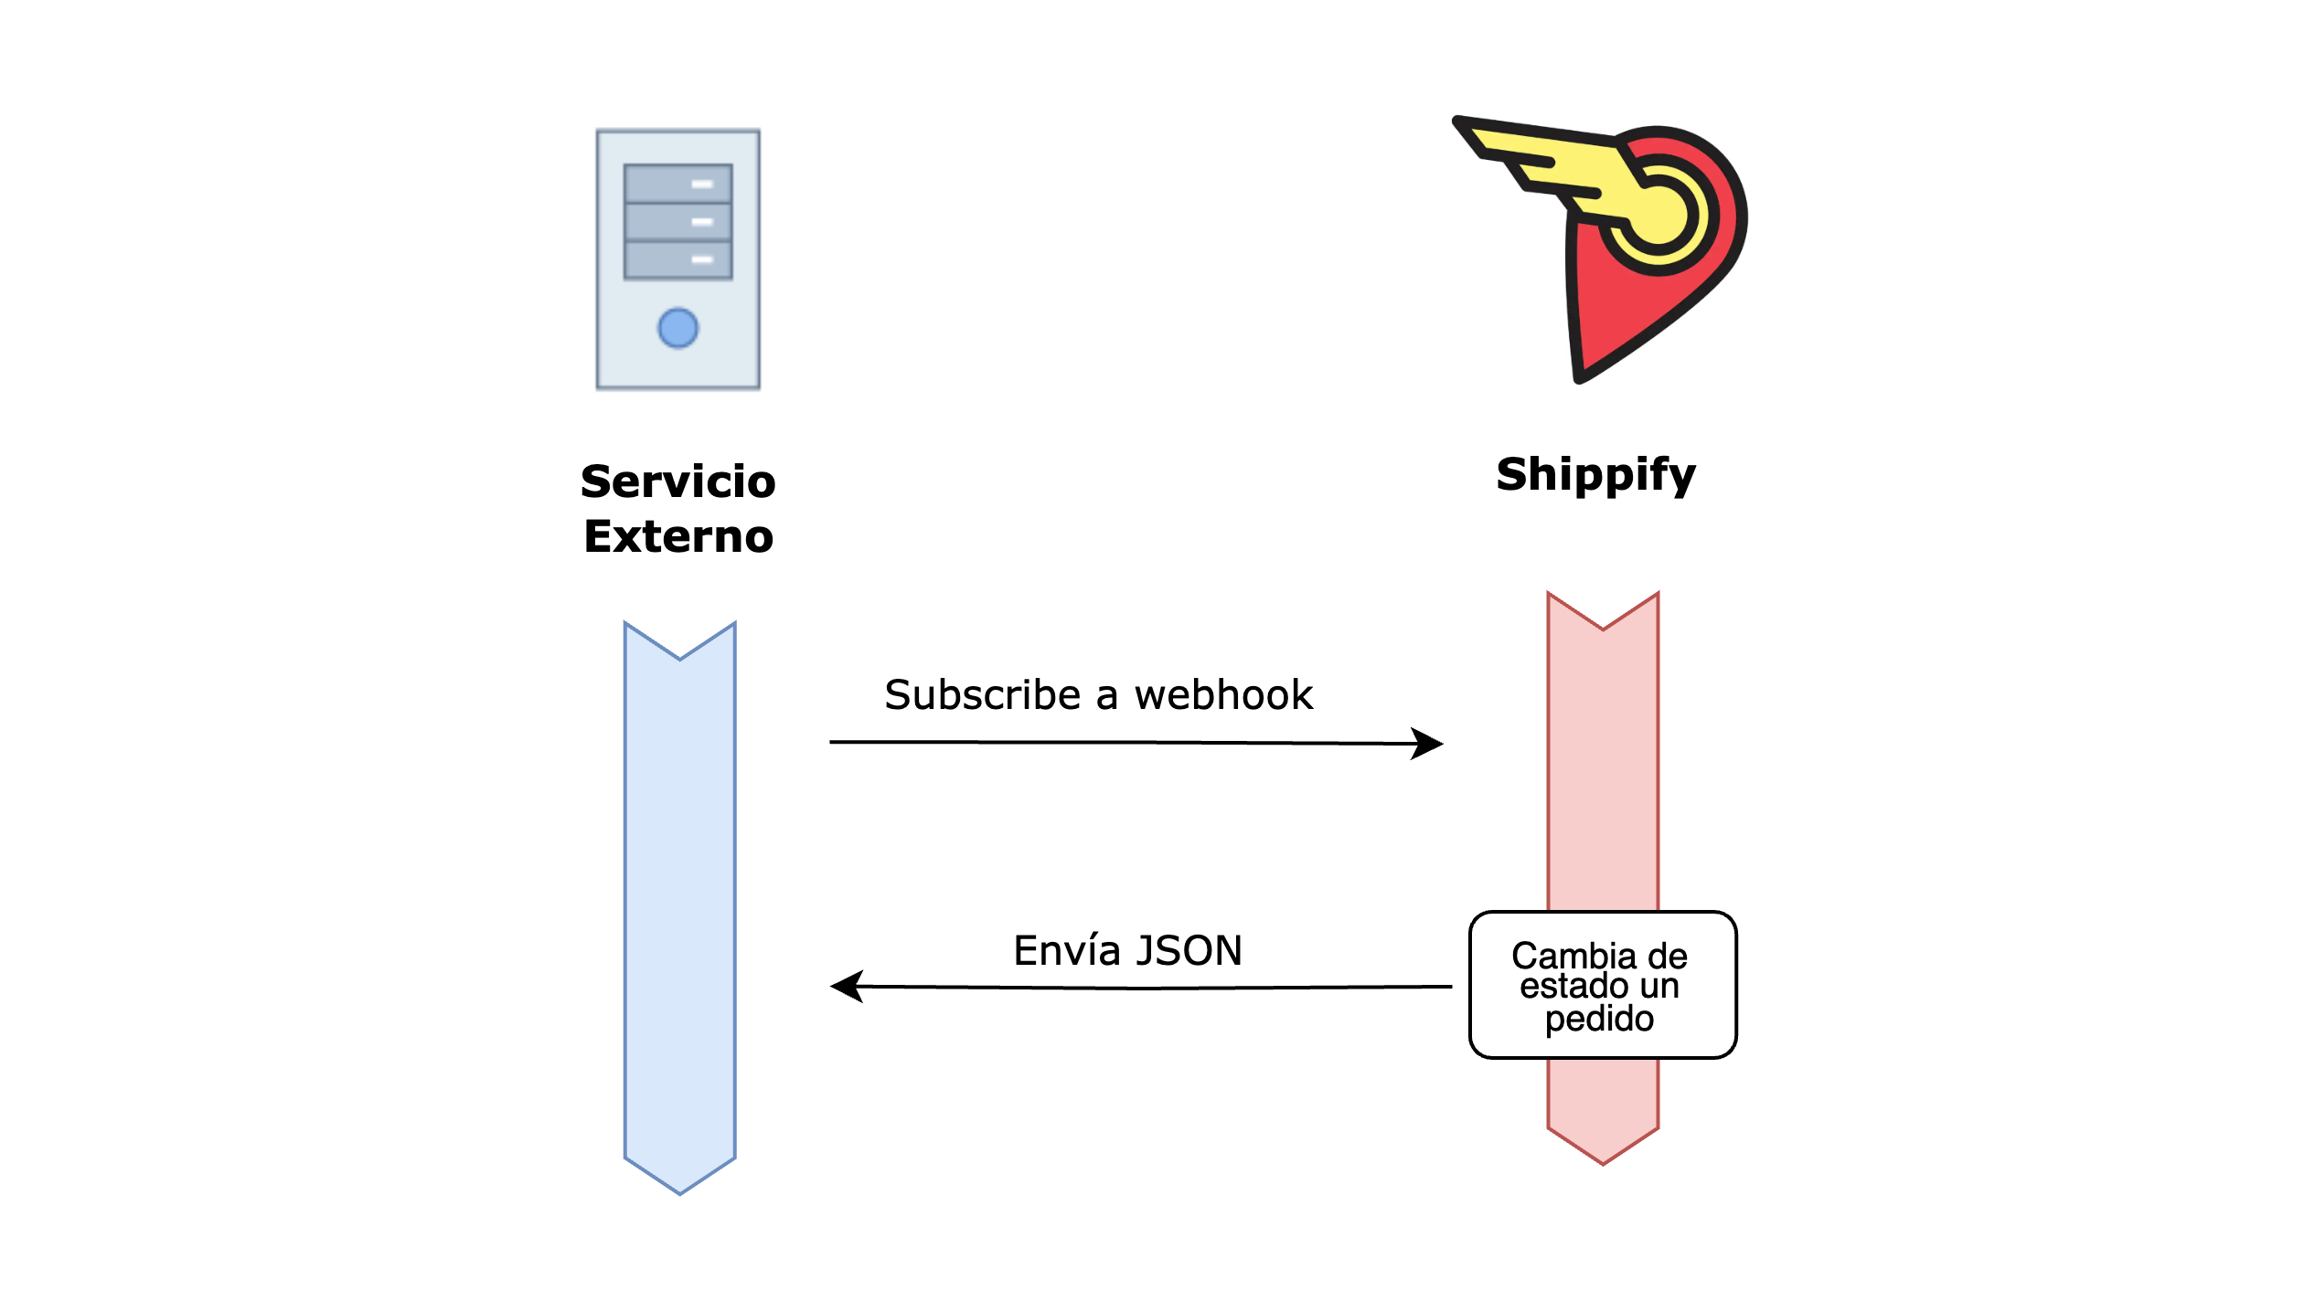
This method involves subscribing one of your endpoints to our webhook. This way, every time there's a change of state within the platform, we'll call that endpoint to inform you of the change. Within this endpoint, you need to interpret the payload sent by us and update the state within your system.

Configurations
For this step, you should have your table ready with the equivalent states of Shippify in your platform. If you don't have it yet, access this link to create it. For each state that you need to update in your platform, you'll have to create a separate webhook following the given steps:
 Create a Webhook
 Create a Webhook
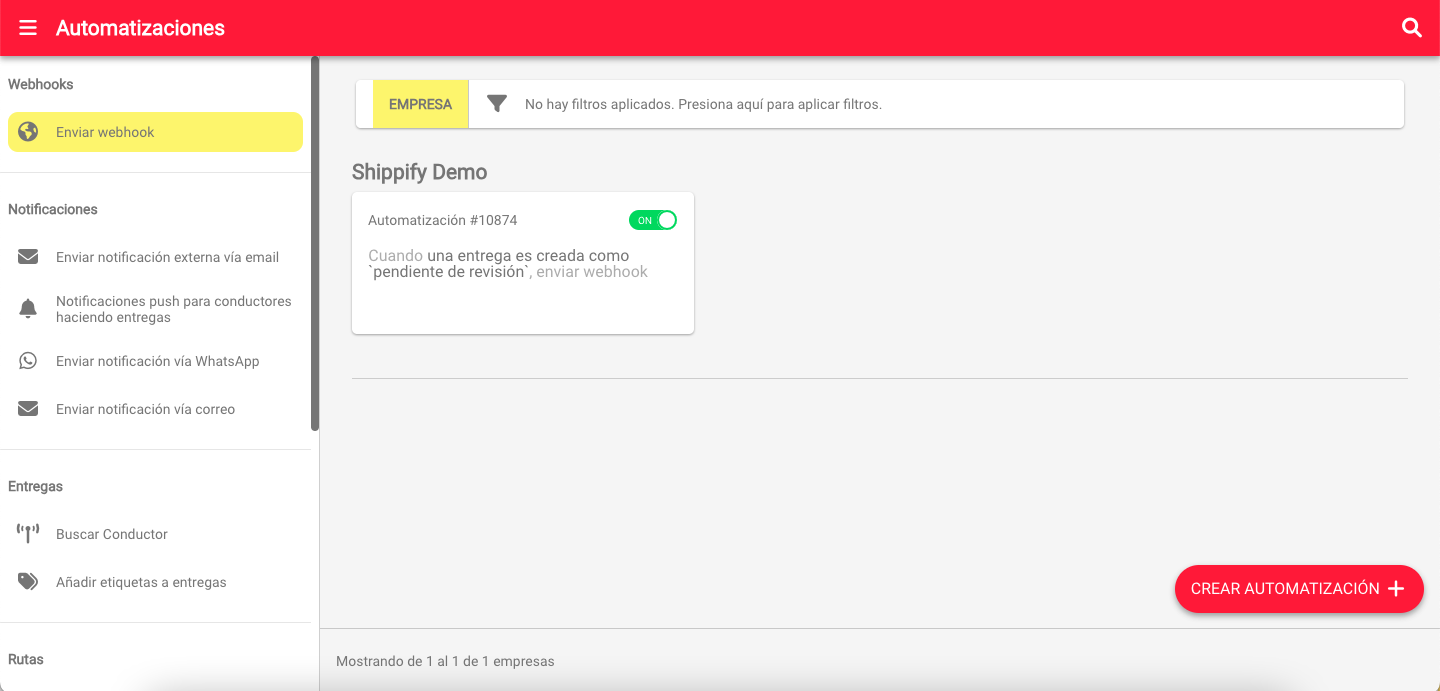
In your Shippify account, go to the left menu, select the Automations section, look for Send Webhook in the left sidebar menu, or enter directly through this link and press the button CREATE AUTOMATION +.

 Configuring a Trigger
 Configuring a Trigger
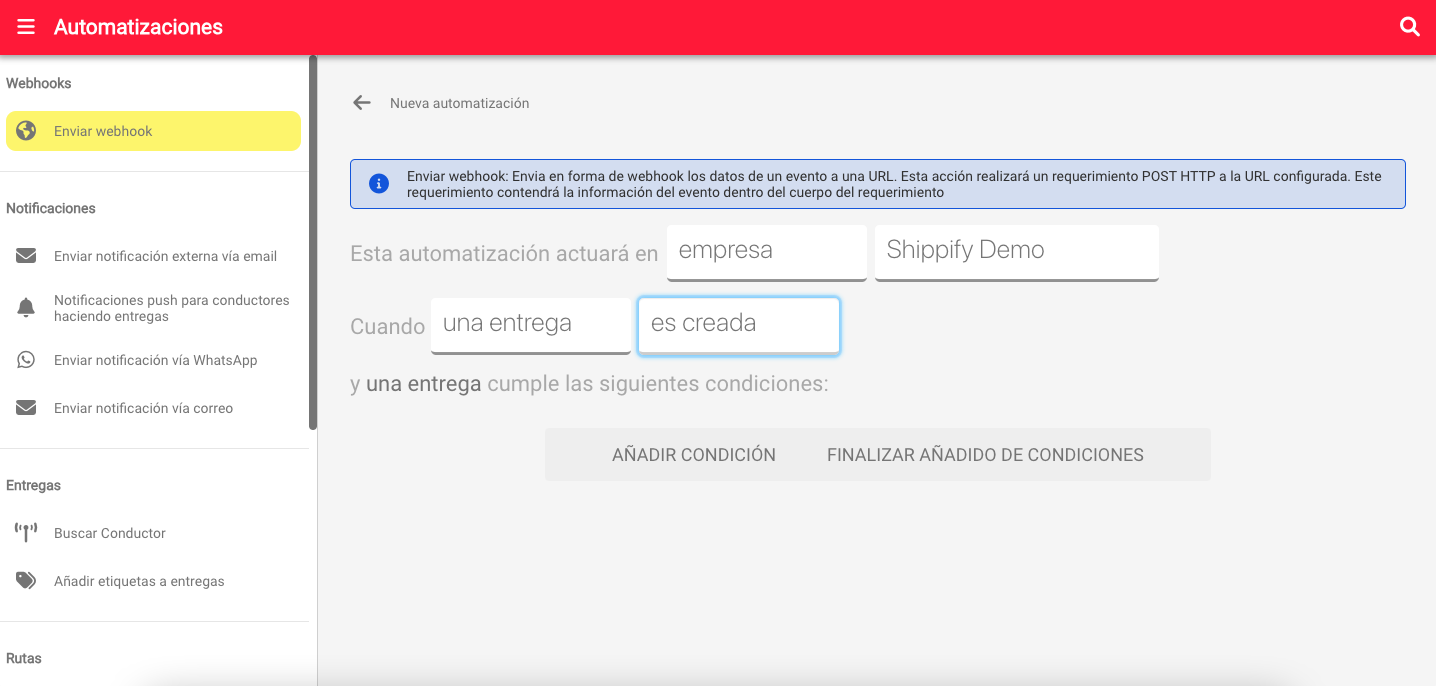
Choose the rules for executing your automation. You need to select the scope in which the automation will work, the event that will trigger the automation, and any additional conditions if needed.
For our case, the entity we will choose is a delivery, and the event is the state you want the update to be sent. In case your table defines a delivery issue reason or an additional label, you should add this data as conditions.

 Configuring a Webhook
 Configuring a Webhook
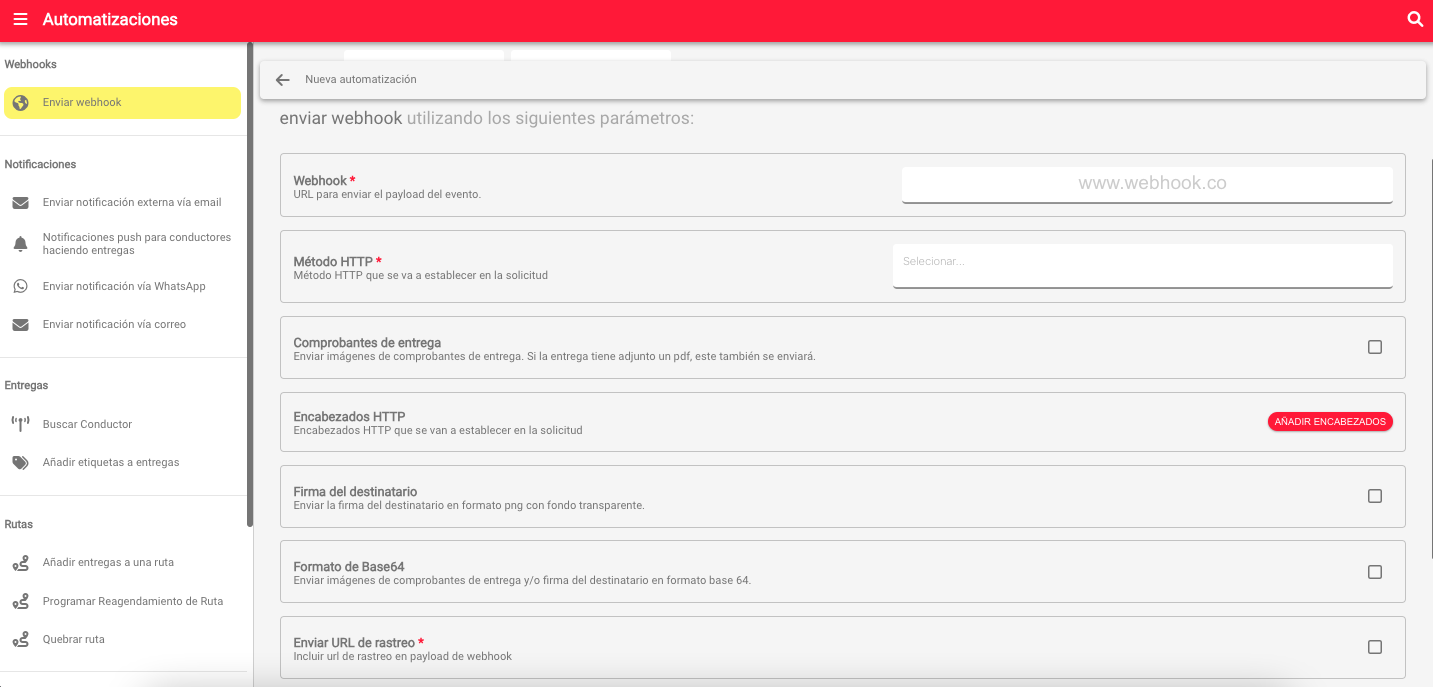
In this step, you need to add the information of the endpoint where the notifications will be sent and configure if you want to send extra data.

Define the parameters you need for your Webhook Automation.
Webhook
URL to which the event payload will be sent.
Method HTTP
Request method HTTP to send the payload.
Delivery proof
In case the event has attached images, choose whether you want to add them to your payload as images. (Array[]).
HTTP Headers
Custom headers for the HTTP request.
Recipient's signature
Attach the recipient's signature as a PNG image with a transparent background. Add it to the payload as "signature". (String)
Base64 format
The proof of delivery or signature images are sent in base64 format. (If not marked, then it's a URL)
Tracking URL
Include private tracking URL of the delivery. You will find it in the payload as trackingUrl. (String)
After configuring it, click on "create", optionally, you can give it a name. From that moment on, each time the events and conditions are met, we will call your endpoint to notify the event.
Payload
The payload sent to the webhook is extensive and contains a lot of information. Here's the meaning of each property:
id
Delivery ID
routeId
Route ID
networkId
ID of the drivers network
networkName
Name of the drivers network
cityId
ID of the pickup city
cityName
Name of the pickup city
cityLang
Language of the pickup city
jobId
The identifier of the current process, null if it doesn't have a process
blocked
Indicates if a task is blocked
companyId
Identifier of the delivery company.
companyName
Name of the delivery company.
companyPlanType
Delivery company plan (pre or post paid)
companyParentId
Parent company identifier of the delivery
companyMode
Company type: 1 basic, 2 SAAS
shipperId
Driver identifier performing the delivery
shipperMobile
Driver's phone number
type
Delivery type: flex, express or regular
vehicleCapacity
Vehicle capacity 1-5 bicycle-truck
vehicleId
Vehicle ID
price
Delivery price
insurance
Delivery insurance
scheduledStartPickingDate
Estimated start date of pickup
scheduledEndPickingDate
Estimated final date of pickup
effectivePickupDate
Acutal pickup date
arrivalPickupDate
Date when the driver arrives at the pickup point
scheduledStartDeliveryDate
Estimated start date of delivery
scheduledEndDeliveryDate
Estimated final date of delivery
effectiveDeliveryDate
Actual delivery date
arrivalDeliveryDate
Date when the driver arrives at the delivery point
creationDate
Date of when the task was created
pickupDueDate
Maximum pickup date
deliveryDueDate
Maximum delivery date
pickingPlace
Pickup information
pickingPlace.lat
Pickup point latitude
pickingPlace.lng
Pickup point longitude
pickingPlace.originalAddress
Pickup address sent by integration
pickingPlace.address
Pickup address adjusted by Google
droppingPlace
Delivery information
droppingPlace.lat
Delivery point latitude
droppingPlace.lng
Delivery point longitude
droppingPlace.originalAddress
Delivery address sent by integration
droppingPlace.address
Delivery address adjusted by Google
recipientInfo
Recipient information
senderInfo
Sender information
state
Delivery status code
tags
Delivery digital tags
items
Information about the delivery packages
items.id
Package ID
items.name
Package name
items.size
Package size
items.price
Package price
items.weight
Package weight
items.pickedUp
Indicates if a package has been collected
items.delivered
Indicates if a package has been delivered
items.scanned
Indicates if a package has been scanned
items.qty
Quantity of packages
referenceId
External identifier of the delivery
notes
String with the reason for the state change
attempts
Number of delivery attempts
countryCode
Country code
countryName
Country name
currencyCode
Currency symbol of the country
formulaId
ID of the quote applied
distance
Distance between the pickup point and the delivery point
distanceRoute
Distance between the delivery point and the previous point in the route
distanceCharged
Distance charged
totalPackagePrice
Total of packages prices
eventEntity
Entity under which the event was generated
eventDate
Date on which the event was executed
lastEventParams
Information about the author of the event
collected
Indicates whether the packages have already been collected
paid
Indicates if the delivery has been paid
notesJson
The object where the reason for the change of state is stored
notesJson.comment
General comment about the state change
notesJson.reason
Reason for the state change
notesJson.reasonId
Reason ID
itemsNumber
Total of itens in the delivery
itemsWeight
Total weight of the delivery
itemsPrice
Total price of the delivery
references
Delivery extra information
incidences
Delivery incidences
metadata
Delivery extra information
previousStatus
Previous status
eventType
Event type
eventAuthor
Information of the user who performed the event
eventCreatedAt
Date when the event was created
eventDescription
Event description
eventParams
Parameters sent to the event
status
Current status of the delivery
eventId
Event ID
images
Array of images of the delivery proofs. It can be in URL or base64 format depending on the configuration
signature
Attach the recipient's signature as a PNG image with a transparent background. It can be in URL or base64 format depending on the configuration
trackingUrl
Private delivery tracking URL
How to test the webhook?
Once the automation is created, you can proceed to test it. If you do not yet have an endpoint ready to receive updates, you can use a test endpoint to test the webhook configuration and see the payload. For this example, we will configure the webhook automation to send the update when the delivery changes to "Completed" status.

Create a delivery in Dash (if you have already created one you can skip this step).
Change the status as appropriate for the automation, in this case, we will change the status to Completed because that is how we configured our test automation.

Observe the payload sent to the webhook, in this case we used a test webhook so we can see the payload sent, in case you already have an endpoint configured to receive notifications you can place a log to identify that the call was made.

Within the automation, you can see the failed and successful executions of the automation along with the identifier of the associated delivery. In this case, we have a successful execution for delivery t-pruaas-5104.

Subscribers to errors
Once the webhook is successfully configured, error subscriptions can be activated. Here you can register one or more emails in which alerts will be sent whenever a notification fails to be sent or the endpoint responds with an error.


Custom configurations
If you need to use the webhook but require receiving a different payload than the previous one, you must request it by email, attaching the payload you want to receive for each state, and send it to [email protected] with the following table corresponding to Shippify's statuses.
Última actualización